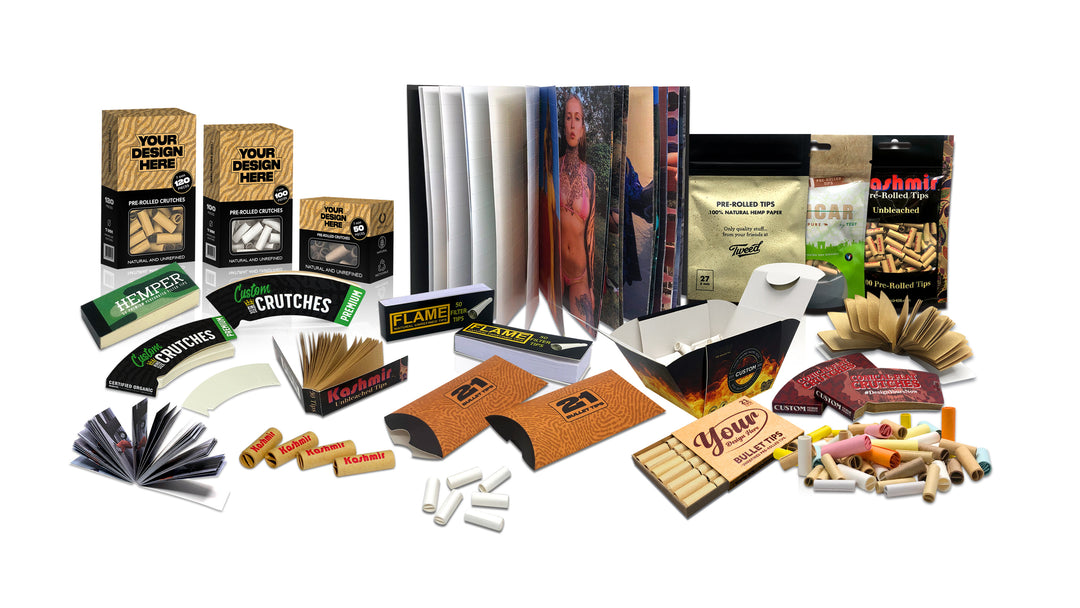
How to Roll Glass Tips: The Complete 2025 Guide 🌟

How to Roll Glass Tips: The Complete 2025 Guide 🌟


Rolling with glass tips has completely transformed the game for enthusiasts who want cleaner, smoother, and more consistent sessions. Whether you're a complete beginner wondering how to roll glass tips for the first time or a seasoned pro looking to perfect your technique, this comprehensive guide will walk you through everything you need to know.

From selecting the perfect size to mastering advanced rolling techniques, cleaning hacks, troubleshooting common issues, and pro-level tips that'll have you rolling like a champion—we've got you covered. Let's dive in and elevate your rolling experience to the next level! 🚀

⚡ Quick Answer: How to Roll Glass Tips

Here's the fast version: Position your glass tip at the mouth-end of your paper, align it perfectly straight, then roll the paper around it while maintaining steady, even tension. Tuck the edge smoothly over the tip, continue rolling into a tight cylinder, and finish with a gentle pinch-and-twist motion where paper meets glass to lock everything in place. Do a quick airflow test, adjust if needed, and you're golden! ✨

🎯 Why Roll with Glass Tips? The Game-Changing Benefits

Before we get into the how-to, let's talk about why glass filter tips have become the gold standard for quality-conscious rollers. Understanding the benefits will help you appreciate the technique and motivate you to master it.

🌱 Eco-Friendly & Sustainable

Unlike disposable paper or cardboard tips that end up in the trash after a single use, glass tips are infinitely reusable. One quality glass tip can replace thousands of disposable alternatives over its lifetime. This isn't just better for your wallet—it's a meaningful step toward reducing waste and making more sustainable choices. Every session with a glass tip is one less piece of trash in a landfill. Pretty cool, right? ♻️

😊 Superior Comfort & Feel

Paper tips have a tendency to get soggy, collapse, or feel flimsy after a few draws. Glass tips stay firm, smooth, and cool throughout your entire session. The consistent structure means no more wet, mushy mouth-ends or fingers that stick to damp paper. The cool glass surface feels pleasant against your lips, and the solid construction gives you confidence in every draw. It's a night-and-day difference in comfort! 👄

🔬 Cleaner, Smoother Experience

The internal channels and designs of quality glass tips help filter out unwanted particles and provide smoother draws. Glass doesn't absorb moisture or residue, which means cleaner airflow session after session. You'll notice fewer particles reaching your mouth, and the overall experience feels more refined and controlled.

🌿 Pure, Unaltered Flavor

This is huge for flavor enthusiasts! Glass is completely neutral and non-porous, meaning it won't interact with or absorb the flavors of your herbs. Unlike some materials that can add subtle notes or mute certain flavor profiles, glass delivers pure, true-to-strain taste every single time. If you're all about savoring those complex terpene profiles, glass is the only way to go.

💪 Structural Integrity

A quality glass tip provides the structural foundation for a perfectly shaped roll. It prevents the mouth-end from collapsing, pinching closed, or getting deformed during the session. This means consistent airflow from start to finish—no sudden blockages or uneven draws. Your rolls look better, hit better, and last longer with proper glass tip support.

💰 Cost-Effective Long-Term

While the initial investment might be slightly higher than a pack of disposable tips, the math speaks for itself. One glass tip replaces hundreds or thousands of single-use alternatives. For regular users, this translates to significant savings over months and years. Plus, many premium glass tips come with protective cases, making them easy to transport and protect.

🔍 Understanding Glass Tip Types & Styles

Not all glass tips are created equal! Understanding the different types and styles will help you choose the right one for your rolling preferences and technique.

🔄 Roll-In vs. Slip-On: The Two Main Formats

Roll-In Glass Tips 🎯

Roll-in tips are designed to be integrated directly into your paper during the rolling process. You place the glass at the mouth-end and roll the paper around it, creating a seamless, built-in connection. This format offers the best structural integrity and creates the most professional-looking finish. It's the preferred method for those who enjoy the traditional rolling experience and want maximum control over the final product.

Best for: Traditional rollers, those who prioritize aesthetics, anyone who wants maximum structural stability, and people who enjoy the full rolling ritual.

Slip-On Holders 📌

Slip-on holders are hollow glass tubes that you insert your finished roll into after it's already rolled and sealed. Think of them as reusable mouthpieces that slide onto your creation. They're incredibly convenient, especially for pre-rolls or when you want to quickly add a glass tip to something you've already prepared.

Best for: Pre-roll enthusiasts, beginners who find rolling intimidating, quick sessions, sharing situations, and those who value maximum convenience over aesthetics.

👄 Mouth-Shape Varieties

Round/Cylindrical ⚪

The classic shape—a simple cylinder that feels familiar and comfortable. Round tips offer unrestricted airflow and a traditional feel. They're versatile, widely available, and work well with any rolling style.

Flat/Pinched Mouthpiece 💋

Flat or "pinched" tips feature a wider, flattened mouth-end that distributes contact across more of your lip surface. Many users find this design more comfortable, and it often provides a slightly denser draw that some people prefer. Plus, they have that vintage, sophisticated aesthetic that looks seriously cool.

Helix/Vortex Interior 🌀

These feature an internal spiral design that creates a gentle swirling effect in the airflow. The twisted interior helps trap particles even more effectively, provides natural cooling, and adds a bit of resistance that many users find satisfying. They're perfect for those who want the ultimate in filtration and smoothness.

🎨 Material Quality Matters

Always look for borosilicate glass—the same material used in high-end lab equipment and durable kitchenware. Borosilicate can handle temperature changes without cracking, resists scratches, and maintains its clarity over time. Cheaper glass alternatives may cloud, crack, or chip more easily. Invest in quality, and your tips will last for years.

💡 Pro Tip: Build Your Tip Collection Strategically

Don't overthink it when starting out! Grab one quality 8-9mm roll-in tip and one slip-on holder in the same size range. This combo covers about 90% of rolling situations. Once you've mastered the basics with these, you can experiment with different mouth shapes, sizes, and specialty designs. Starting simple helps you build solid technique before getting fancy! 😉

📏 Choosing the Right Size for Perfect Rolls

Size matching is absolutely crucial when learning how to roll glass tips. Get the diameter wrong, and you'll struggle with loose rolls, restricted airflow, or tips that simply won't fit. Let's break down the sizing system so you can choose confidently every time.

📐 The Diameter Guide

Slim Range: 6mm - 7.5mm

Perfect for: Single-wide papers (70mm), slim rolling papers, smaller personal rolls, and ultra-portable setups. These are great for conserving material and creating discreet, pocket-friendly pieces.

Standard Range: 8mm - 9mm

Perfect for: 1¼ size papers (78-79mm), standard rolling papers, and the most common pre-roll sizes. This is the sweet spot for most users—versatile enough to work with slight variations in paper width and rolling tightness. If you're buying your first glass tip and use standard papers, start here. This is your "can't go wrong" zone! ✅

Large Range: 10mm - 12mm

Perfect for: King-size papers (100mm+), large cones, party rolls, and anything designed for groups or extended sessions. These substantial tips provide excellent structure for bigger creations and can handle the airflow demands of larger diameter rolls.

🎯 How to Measure Your Perfect Fit

Here's a simple method to find your ideal size if you're between options:

  1. Roll a test piece: Make a normal roll with whatever paper you typically use, using your usual technique and tightness.
  2. Measure the mouth-end: Use a ruler or caliper to measure the diameter at the mouth-end (tip area).
  3. Choose slightly smaller: Select a glass tip that's about 0.5-1mm smaller than your measurement. This ensures you'll have enough paper to wrap around the tip with good tension.
  4. Test and adjust: Your first few rolls will help you dial in whether you need to adjust your rolling tightness or tip size.

💡 The Universal Fit Trick

When in doubt, slightly undersized is better than oversized! It's much easier to roll paper around a tip that's a hair too small (you just maintain slightly firmer tension) than to try forcing paper around an oversized tip. A 0.5mm difference can make or break your roll, so err on the side of caution. Your fingers will thank you! 🙌

🛠️ Essential Tools You'll Need

Having the right tools makes learning how to roll glass tips so much easier. Here's your essential toolkit:

✅ The Must-Haves

  • Quality Glass Tip: Obviously! Start with one properly sized for your papers.
  • Rolling Papers: Fresh, uncrumpled papers in your preferred size and material.
  • Grinder: Consistent grind = easier rolling and better airflow.
  • Flat Rolling Surface: A small tray, rolling tray, or even a hardcover book works great.
  • Cleaning Supplies: Isopropyl alcohol (70-91%), cotton swabs, and a small container for soaking.

🎁 Nice to Have (But Not Essential)

  • Packing Tool: For adjusting herb distribution during rolling.
  • Humidity Pack: Keeps your herbs at optimal moisture for easier rolling.
  • Rolling Machine: Can help beginners get consistent results while learning.
  • Protective Case: Keeps your glass tip safe when traveling.
  • Magnifying Glass: Helps inspect your tip for any cracks or chips before use.

⚠️ Safety First: Inspect Your Glass Tip

Before every session, quickly check your glass tip for any chips, cracks, or rough edges. Damaged glass can be sharp and unsafe. If you spot any damage, it's time for a replacement—don't risk it! Your lips and safety are worth more than trying to squeeze extra life out of a compromised tip. Quality glass tips are affordable enough that replacing a damaged one is a no-brainer. Stay safe! 🛡️

📝 How to Roll Glass Tips: Step-by-Step Instructions

Alright, this is what you came for—the actual technique! We'll cover both methods in detail so you can choose the approach that works best for your style.

Method 1: The Roll-In Technique 🎯

This is the traditional, most popular method for incorporating glass tips into your rolls. It creates the most seamless finish and provides maximum structural integrity. Let's break it down step by step.

Step 1: Prepare Your Workspace 🧹

Clear a clean, flat surface. Make sure your hands are dry (slightly damp hands make paper stick). Have your ground material ready, your glass tip inspected and clean, and your paper laid flat. Good preparation makes everything easier!

Step 2: Position the Glass Tip 📍

Place your glass tip at one end of your paper—this will become the mouth-end. Position it so about 1-2mm of glass extends beyond the paper edge. This extra bit gives you something to grip while rolling and helps with alignment. Make sure the tip is perfectly parallel to the paper edge—any angle here will cause problems later!

Step 3: Add Your Material 🌿

Distribute your ground material evenly along the paper, leaving a small gap right next to the glass tip. This gap is crucial—it gives you room to execute the initial tuck without fighting against packed material. Aim for even distribution with a slight taper toward the end opposite the glass tip.

Step 4: The Initial Tuck 🎯

This is the make-or-break moment! Hold the glass tip firmly in place with your thumbs while using your index fingers to tuck the paper edge over the top of the tip and material. The goal is to create a tight "pocket" around the glass tip with the paper edge wrapped over and around it. This first tuck sets the foundation for everything that follows.

Common mistake: Tucking too loosely. Really press that paper edge down and around the glass—it should feel snug but not forced.

Step 5: Begin Rolling 🔄

Now comes the rolling motion. Using your thumbs and index fingers, start rolling the paper forward and upward. Maintain consistent tension—not death-grip tight, but firm and controlled. Think of it like you're forming a burrito wrap that needs to hold together but still be rollable.

As you roll, constantly check that:

  • The glass tip stays centered and parallel
  • The paper is wrapping smoothly without bunching
  • Material stays evenly distributed
  • You're maintaining consistent tension throughout

Step 6: The Continuous Roll 🎢

Continue rolling until you've formed a nice, tight cylinder. Work your way from the glass tip end toward the opposite end in smooth, continuous motions. Don't rush this—speed comes with practice. For now, focus on consistent tension and smooth paper movement.

Your thumbs should be doing most of the work, with index fingers providing guidance and support. Some people like to slightly rock the roll back and forth as they go to help work out any unevenness.

Step 7: Seal the Deal 💦

Once you've rolled to the gum strip, lick it thoroughly (but not excessively—you don't want soggy paper). Continue rolling to press the gum strip firmly against the body of the roll. Run your finger along the seal to make sure it's adhered completely from end to end.

Step 8: The Pinch-and-Twist Technique 🔒

Here's a pro move that locks everything in place: Where the paper meets the glass tip, gently pinch the paper with your thumb and index finger, then give it a subtle twist (maybe 5-10 degrees of rotation). This creates a small "crimp" that helps anchor the paper to the glass and prevents any slippage. Don't overdo it—we're talking a very gentle motion here!

Step 9: Test Your Airflow 🌬️

Before you finish the opposite end, do a test draw through the glass tip. You're checking for:

  • Resistance level: Should have slight resistance but feel natural—not like sucking through a coffee stirrer, but not completely free either
  • Evenness: Airflow should feel consistent, not pulsing or restricted
  • Blockages: Should be none! If you feel a blockage, you might have material blocking the glass tip channel or the roll might be pinched somewhere

Step 10: Pack and Finish ✅

Use a packing tool or something similar to gently pack the open end if needed. Give it one final structural check, make sure the glass tip is secure, and you're done! Congratulations—you've just rolled your first glass tip roll! 🎉

💡 The Barrel Roll Technique (Advanced)

Once you're comfortable with the basic roll-in method, try this: Instead of rolling on a flat surface, try rolling in the air using just your fingers. This "barrel roll" technique gives you more control over tension and allows you to adjust pressure dynamically as you roll. It takes practice but results in some of the tightest, most consistent rolls you'll ever make. It's definitely a party trick that'll impress your friends! 😎

Method 2: The Slip-On Holder Technique 📌

Prefer convenience? The slip-on method is perfect for pre-rolls, quick sessions, or when you're still building your rolling confidence.

Step 1: Roll Your Piece Normally 🎯

Create your roll using whatever method you're comfortable with—traditional hand rolling, a rolling machine, pre-made cones, whatever works! The only consideration: aim for a diameter that'll fit your slip-on holder. Typically, this means rolling slightly thinner than you might otherwise, but not by much.

Step 2: Prepare the Insertion 🔍

Make sure the mouth-end of your roll is cut cleanly and evenly. Any paper sticking out or uneven cuts will catch on the holder and cause frustration. A clean cut = smooth insertion. Some people like to gently pinch the very end to create a slight taper, which helps with initial insertion.

Step 3: The Twist-and-Push Method 🔄

Hold your slip-on holder in one hand and your roll in the other. Position the roll end at the opening of the holder, then slowly insert while simultaneously giving a gentle rotating motion—like you're screwing it in. This twisting action prevents the paper from crumpling and helps it slide smoothly into the holder.

Key tip: Apply steady, even pressure. Rushing or forcing it will crumple your roll. Slow and steady wins this race!

Step 4: Find the Sweet Spot 🎯

Insert until you feel slight resistance—that's your signal to stop. You want the roll seated firmly enough that it won't slip during use, but not jammed so hard that you're crushing material or restricting airflow. Generally, about 5-10mm of insertion depth is perfect.

Step 5: Alignment Check 📏

Look down the length of your setup. The roll and holder should form a straight line. If there's any angle or wobble, gently adjust by slight pushing or twisting until everything is aligned. Proper alignment ensures even airflow and prevents the holder from feeling awkward in your lips.

Step 6: Test and Adjust 🌬️

Do a test draw. If airflow feels restricted, try backing the roll out slightly. If it feels loose or like air is escaping around the edges, push it in a hair more or try a gentle twist-and-press to improve the seal.

💡 The Pre-Roll Prep Trick

If you frequently use slip-on holders with pre-rolls, try this: When rolling or packing pre-rolls, intentionally make the mouth-end slightly narrower by packing less material in that zone. This creates a natural taper that slides into holders effortlessly every single time. You can batch-prep dozens of "holder-ready" rolls this way! 🚀

💪 Mastering Paper Tension & Alignment

The difference between a mediocre roll and a masterpiece often comes down to tension control. Let's break down this crucial skill.

🎯 Understanding Perfect Tension

Perfect tension is that Goldilocks zone—not too tight, not too loose, but just right. Too tight and you'll restrict airflow, potentially tear the paper, or create a dense roll that doesn't hit well. Too loose and your roll falls apart, burns unevenly, or feels flimsy.

Signs of Correct Tension ✅

  • The roll feels firm but slightly springy when you gently squeeze it
  • No visible gaps between paper and glass tip
  • Material is contained but not compressed into a brick
  • You can see the spiral of your roll when looking closely
  • Airflow test produces slight resistance but flows naturally

Signs of Too Much Tension ⚠️

  • Paper feels stretched or shows stress marks
  • Roll feels rock-hard when squeezed
  • Excessive resistance during airflow test
  • Material looks compressed and dense
  • Glass tip feels like it's being squeezed by the paper

Signs of Too Little Tension ⚠️

  • Roll feels soft or squishy
  • Gaps visible between paper layers
  • Glass tip wiggles or moves easily
  • Almost no resistance during airflow test
  • Roll looks lumpy or uneven

🎯 Alignment Mastery

Even if your tension is perfect, poor alignment will ruin your roll. Here's how to nail it every time:

The Three-Point Check Method

  1. Starting alignment: Before you begin rolling, confirm your glass tip is parallel to the paper edge. Use the straight edge of your rolling surface as a guide.
  2. Mid-roll check: Pause halfway through rolling to ensure everything is still straight. This is your chance to correct any drift before it becomes permanent.
  3. Final verification: After sealing but before the pinch-and-twist, look down the length of your roll from multiple angles. Any wobble or angle should be corrected now.

💡 The Mirror Trick

Having trouble seeing alignment issues? Roll near a mirror! The reflection gives you a totally different perspective and makes alignment problems immediately obvious. It's like having a second pair of eyes checking your work. Once you train yourself this way, you'll develop an innate feel for perfect alignment. 🪞

🌬️ Airflow Optimization Secrets

Airflow can make or break your experience. Let's explore how to optimize it for your perfect draw.

Understanding Airflow Dynamics 🌪️

When you draw through your roll, you're creating negative pressure that pulls air through three key pathways:

  1. The glass tip channel: Your air enters here and flows through the tip's interior
  2. The paper-to-glass junction: This seal must be airtight or you'll get leaks and weak draws
  3. The material column: Air moves through the spaces between ground material particles

Optimizing each of these elements creates that perfect draw that feels effortless yet satisfying.

🎯 Dialing In Your Perfect Draw

For a Freer, More Open Draw

  • Roll with slightly less tension (easier said than done—takes practice!)
  • Use round glass tips rather than flat ones
  • Grind your material slightly coarser
  • Choose glass tips with larger internal diameters
  • Pack the material column less densely

For a Tighter, More Restricted Draw

  • Increase rolling tension moderately
  • Try flat or pinched mouthpiece designs
  • Use helix/vortex interior glass tips
  • Grind material slightly finer (but not powder-fine)
  • Pack material more densely, especially near the tip

The Airflow Test Protocol 🧪

Here's how to scientifically test your airflow before finishing your roll:

  1. Cold draw test: Draw through the roll before lighting. You should feel moderate resistance—about the same as drinking through a regular straw.
  2. Consistency check: Take 3-4 test draws. They should all feel identical. Variation means uneven packing or alignment issues.
  3. The paper cover test: Cover the opposite end with your hand and draw through the glass tip. You should feel suction but the roll shouldn't collapse. This tests structural integrity.
  4. The comparison test: If you have a roll you know draws perfectly, compare them side-by-side. This helps calibrate your feel for what "right" actually feels like.

⚠️ The Wet Draw Problem

If your glass tip has any moisture inside (from cleaning or condensation), it can significantly affect airflow and taste. Always, always dry your tips completely before use! A quick hit with a hair dryer or leaving them near (not on) a warm surface speeds up drying. Trust me—this tiny step makes a massive difference! 💧

🔧 Troubleshooting Common Problems

Even experienced rollers encounter issues. Here's how to fix the most common problems when learning how to roll glass tips.

Problem #1: Roll Keeps Coming Loose 😤

Symptoms: Paper unwraps from glass tip, junction feels loose, glass tip spins or slides.

Solutions:

  • Tension adjustment: You're probably rolling too loosely. Increase pressure during the initial tuck and throughout the rolling process.
  • Pinch-and-twist refinement: Do a more pronounced pinch-and-twist at the junction (still gentle, but more deliberate).
  • Size check: Your glass tip might be too small for your paper width. Try sizing up 0.5-1mm.
  • Paper moisture: If your papers or hands are damp, adhesion suffers. Dry hands and fresh papers make all the difference.
  • Gum strip activation: Make sure you're thoroughly wetting the gum strip. Under-moistened gum doesn't seal properly.

Problem #2: Airflow Too Tight/Restricted 😮💨

Symptoms: Hard to draw through, feels like sucking through a coffee stirrer, cheeks cave in when you try to hit it.

Solutions:

  • Back-roll technique: Gently unroll the last 1-2cm of paper, then re-roll with less tension.
  • Material redistribution: Use a packing tool to carefully loosen the material column, especially near the glass tip.
  • Check for blockages: Is there material actually blocking the glass tip channel? Inspect and clear if needed.
  • Glass tip inspection: Some tips have narrower internal channels. Consider a wider-bore alternative.
  • Grind adjustment: Your material might be ground too fine and compacting. Use a coarser grind.

Problem #3: Airflow Too Open/Loose 💨

Symptoms: Feels like you're barely drawing any resistance, burns too fast, harsh hits.

Solutions:

  • Increase tension: Re-roll with firmer pressure throughout the entire process.
  • Pack adjustment: Add a tiny bit more material or pack existing material more densely.
  • Micro-shim method: Roll a very thin strip of paper (1mm wide) and place it along the glass tip before rolling. This fills the gap without being noticeable.
  • Paper-press technique: After rolling, gently roll the mouth-end section on a hard surface while applying light pressure. This compresses the paper layers and tightens the seal.

Problem #4: Glass Tip Wobbles or Falls Out 🔄

Symptoms: Tip moves around, feels loose, might even fall out with gentle handling.

Solutions:

  • Emergency grip band: Use a small silicone band (hair ties work in a pinch) around the junction to lock everything in place.
  • Paper strip wrap: Cut a thin strip of paper, wet one side, and wrap it around the junction like a tiny bandage. Instant stability!
  • Re-seat and re-seal: Carefully unwrap the junction area, re-position the glass tip, and re-roll that section with proper tension.
  • Size verification: Double-check your tip diameter matches your paper width. Wobble often indicates a size mismatch.

Problem #5: Paper Tears During Rolling 😢

Symptoms: Paper rips, splits, or develops holes while rolling around the glass tip.

Solutions:

  • Pressure moderation: You might be rolling too aggressively. Ease up on the grip strength.
  • Smooth edges: Check your glass tip for any rough spots or edges that might catch paper. Sand smooth if needed (very gently).
  • Paper quality: Cheap or old papers tear more easily. Invest in quality rolling papers.
  • Moisturize if needed: If papers are super dry, breathing on them lightly before rolling can help prevent tears.
  • Start over: If you catch a tear early, it's often better to start fresh rather than try to salvage it.

Problem #6: Uneven Burning 🔥

Symptoms: One side burns faster than the other, runs, canoes.

Solutions:

  • Material distribution: Ensure even distribution throughout the entire length when rolling.
  • Density consistency: The column should be equally dense from glass tip to open end.
  • Alignment correction: Crooked rolls burn unevenly. Focus on keeping everything straight.
  • Dry check: Material that's too moist burns unevenly. Optimal moisture is slightly springy, not damp.
  • Paper quality: Some papers burn more evenly than others. Experiment with different brands.

💡 The Emergency Save Kit

Keep a small kit with: extra rolling papers, a couple slim silicone bands, a toothpick or packing tool, and a small pair of scissors. This kit can save almost any rolling mishap! Stash it with your supplies and you'll never be stuck with a failed roll. It's like rolling insurance! 🎒

✨ Cleaning & Care Guide

Keeping your glass tips clean isn't just about aesthetics—it's essential for maintaining optimal airflow, pure flavor, and longevity. Let's cover everything from quick daily maintenance to deep cleaning protocols.

🧼 The Quick-Clean Routine (After Every Session)

This takes literally 30 seconds and prevents most buildup issues:

  1. Let it cool: Wait 2-3 minutes after use. Hot glass + cold water = potential cracks.
  2. Blow-through: Give it a strong blow from the mouth-end to clear any loose particles.
  3. Warm water rinse: Run warm (not hot) water through the tip from both directions for 10-15 seconds.
  4. Shake-dry: Give it a few firm shakes to expel excess water.
  5. Air-dry position: Stand it upright (mouth-end up) on a paper towel or cloth. Gravity helps!

Do this after every single session and you'll rarely need deep cleaning. It's the easiest habit that pays huge dividends! 💪

🛁 The Deep Clean Process (Weekly or Bi-Weekly)

When residue starts building up despite quick-cleans, it's deep-clean time. Here's the ultimate method:

Step 1: Prepare Your Cleaning Solution

In a small glass or plastic container, pour enough isopropyl alcohol (70-91% concentration) to fully submerge your glass tip. Room temperature alcohol works great—no need to heat it.

Step 2: Initial Soak (5-30 Minutes)

Drop your glass tip into the alcohol. For light buildup, 5-10 minutes is plenty. For heavy residue or if you've neglected cleaning for a while, go for 20-30 minutes. You'll literally watch the residue dissolving and floating away—it's oddly satisfying! 🧪

Step 3: The Shake Method

This is the secret weapon! Cover both ends of the container with your palm or a lid, then shake vigorously for 10-15 seconds. The alcohol sloshes through the tip's internal channels, scrubbing away residue mechanically. You can repeat this 2-3 times with fresh shaking intervals.

Step 4: Cotton Swab Detail Work

For any stubborn spots visible on the outside or in hard-to-reach areas, use cotton swabs dipped in alcohol. Gently scrub any remaining residue. Don't use anything abrasive or metal—keep it soft!

Step 5: Rinse Thoroughly

Run warm water through your tip from both directions for at least 30 seconds. You want to flush out all alcohol residue completely. The last thing you want is alcohol taste on your next session!

Step 6: Dry Completely

This step is crucial—never skip it! You have several options:

  • Air dry: Stand upright on a paper towel for 2-3 hours (or overnight for guaranteed dryness)
  • Hair dryer: Use on low setting, holding the tip at arm's length for 2-3 minutes
  • Blow through: Give it several hard blows to expel water, then air dry for 30-60 minutes

🔬 The Nuclear Option: Super Deep Clean

For tips that haven't been cleaned properly in months (hey, we've all been there), or for stubborn discoloration that won't budge, try this extreme method:

  1. Fill a small pot with water and add a tablespoon of dish soap
  2. Bring to a gentle simmer (not a rolling boil)
  3. Carefully place glass tips in the simmering water
  4. Let them simmer for 10-15 minutes
  5. Remove with tongs, let cool, then proceed with the alcohol soak method
  6. Finish with thorough rinsing and drying

This combo of heat and solvents removes literally everything. Your tips will look brand new! 🌟

📅 Cleaning Schedule Recommendations

Light Users (1-2 times per week):

  • Quick-clean after each use
  • Deep clean every 2-3 weeks

Moderate Users (3-5 times per week):

  • Quick-clean after each use
  • Deep clean weekly

Daily Users:

  • Quick-clean after each session (non-negotiable!)
  • Deep clean every 3-4 days
  • Nuclear option deep clean monthly

❌ Do's and Don'ts

✅ DO:

  • Let glass cool before cleaning
  • Use isopropyl alcohol (safest and most effective)
  • Store clean tips in a protective case or pouch
  • Inspect for cracks or chips before each use
  • Keep multiple tips in rotation so you always have a clean one
  • Dry completely before storing to prevent mildew smell

❌ DON'T:

  • Use abrasive metal brushes or tools (they scratch glass)
  • Put hot glass directly into cold water (thermal shock = cracks)
  • Skip the drying step (moisture = bad taste and potential bacterial growth)
  • Use harsh chemicals like bleach or ammonia (unnecessary and potentially dangerous)
  • Force anything through the channel that's too large (can crack the glass)
  • Store dirty tips (residue hardens and becomes much harder to clean)

⚠️ Health & Safety Note

If you share glass tips with others (which we don't really recommend), cleaning becomes even more critical for hygiene reasons. Between users, at minimum do an alcohol wipe of the mouth-end. Better yet, give everyone their own glass tip to use—they're affordable enough that sharing isn't worth the hygiene concerns. Stay safe and healthy! 🛡️

🧠 Advanced Rolling Techniques

Ready to level up? These advanced techniques separate novices from masters when it comes to how to roll glass tips.

🎯 The Two-Stage Roll Method

This technique creates incredibly uniform rolls with perfect density distribution:

  1. Stage One - The Foundation: Roll just the first third of your paper around the glass tip, creating a tight, perfect cylinder at the mouth-end. Leave the rest flat.
  2. Add and Adjust: Now you can see exactly how your material is distributed in the remaining two-thirds. Add or remove as needed for perfect evenness.
  3. Stage Two - The Completion: With your foundation secure and material perfectly distributed, complete the roll. The glass tip end stays perfect while you dial in the rest!

This method virtually eliminates the "good mouth-end but messy body" problem that plagues many rollers.

🌀 The Spiral Pack Technique

For achieving optimal airflow in larger rolls:

  1. As you add material to your paper, create a slight spiral pattern with your ground material rather than a straight line
  2. This creates natural air channels throughout the length
  3. When rolled, these channels remain open, ensuring consistent airflow even in dense, large rolls
  4. Works especially well with king-size papers and 10mm+ glass tips

💨 The Pressure-Release Roll

Master this for consistent tension throughout:

  1. Roll with slightly higher tension than normal
  2. Before sealing, hold the roll and squeeze gently along its entire length
  3. You'll feel it "give" slightly as excess tension releases
  4. Now seal—you've got perfect, even tension throughout

This technique compensates for the natural tendency to roll tighter at the beginning and looser at the end.

🎨 The Taper Roll (Cone-Style)

Want that cone shape with a glass tip? Here's how:

  1. Start with a glass tip as usual at one end
  2. Distribute material in a graduated fashion—less near the tip, more at the opposite end
  3. As you roll, allow the paper to naturally form a wider diameter at the material-heavy end
  4. The result: a perfect cone with a pro-level glass tip integration

Cones with glass tips look impressive and offer unique airflow characteristics worth exploring!

🔬 The Custom Airflow Method

For users who want specific draw resistance:

  1. Before rolling, lay out a thin strip of unrolled cotton or hemp fiber along the paper parallel to where your glass tip will sit
  2. Roll as normal, incorporating this fiber strip
  3. The fiber creates a secondary air channel with adjustable flow based on fiber thickness
  4. Experiment with different materials and thicknesses to find your perfect draw

💡 The Competition Roll

Want to show off at your next gathering? Try rolling with one hand while holding a conversation. Start by using your dominant hand to hold the glass tip in place while using your thumb, index, and middle finger to execute the roll. It takes serious practice but is the ultimate flex. Just make sure to perfect normal rolling first—this is definitely graduate-level stuff! 😎

🏆 The Speed Roll Challenge

Once technique is second nature, work on speed:

  • Time yourself rolling with perfect technique (quality > speed initially)
  • Set a baseline—most experienced rollers average 60-90 seconds for a quality roll
  • Gradually reduce time while maintaining quality
  • Experts can roll perfect glass tip rolls in under 30 seconds!

The key is developing muscle memory through repetition. Speed naturally follows mastery of technique.

📦 Storage & Maintenance Tips

Proper storage extends the life of your glass tips indefinitely and keeps them ready for action. Here's how to do it right.

🎒 Storage Solutions

For Home Storage:

  • Small glass jars: Perfect for seeing your collection at a glance. Choose jars with soft interiors or add cotton padding.
  • Sectioned organizers: Craft store bead organizers work brilliantly for multiple tips of different sizes.
  • Padded pouches: Soft microfiber pouches prevent scratches and keep tips together.
  • Dedicated drawers: Line a drawer with felt or microfiber cloth for a premium storage solution.

For Portable Storage:

  • Hard protective cases: Sunglasses cases work perfectly! They're compact, protective, and have crush-proof construction.
  • Tube containers: Old film canisters, pill bottles with padding, or purpose-made tip containers.
  • Protective wraps: Wrap individual tips in soft cloth or paper towel, then secure in a zippered pouch.
  • Multi-compartment cases: Fishing tackle boxes or small tool organizers offer multiple padded sections.

🛡️ Protection Best Practices

  • Separation is key: Don't store multiple glass tips loose together—they can chip each other
  • Padding matters: Even in cases, some padding (cotton, felt, bubble wrap) prevents rattling and impacts
  • Climate control: Extreme temperature swings can stress glass. Room temperature storage is ideal
  • Dry storage only: Moisture + enclosed storage = mildew smell. Always fully dry before storing
  • Regular inspections: Once a month, check your tips for any developing cracks or chips

🔍 Pre-Session Inspection Checklist

Before every session, do a quick 5-second check:

  1. Visual scan: Look for cracks, chips, or clouding
  2. Edge check: Run your finger gently around both openings—should be smooth
  3. Interior look: Hold up to light and look through the channel—should be clear
  4. Smell test: Quick sniff—should smell like glass or very faintly of alcohol, never musty or off

These quick checks catch 99% of potential issues before they become problems.

🌡️ Temperature Considerations

  • Avoid extreme cold: Don't store in unheated spaces in winter (below 40°F/4°C)
  • Avoid extreme heat: Car dashboards in summer are death zones for glass (over 140°F/60°C)
  • Rapid changes: If your tip has been in the cold, let it warm to room temp before use
  • Optimal range: 60-80°F (15-27°C) is perfect for storage and use

🔄 Rotation System

If you own multiple glass tips, use a rotation system:

  1. Number or mark your tips (1, 2, 3, etc.)
  2. Use them in order
  3. After cleaning, move to the back of the rotation
  4. This ensures even wear and you always have clean backup tips ready

Three tips in rotation means you're never without a clean one!

💡 The Travel Kit

Build the ultimate portable setup: Hard case with your favorite glass tip, a mini bottle of isopropyl alcohol (airline-safe size), a few cotton swabs, rolling papers, and your material. Everything protected, organized, and ready to go. It's like having a professional rolling kit that fits in your pocket! 🎯

💎 Upgrade Your Setup with Our Premium Glass Tips

Ready to experience the difference that quality glass filter tips make? We've got you covered with the finest borosilicate glass tips available.

🌟 Why Choose Our Glass Tips?

  • Premium Borosilicate Glass: The same material used in high-end laboratories—heat-resistant, durable, and crystal clear
  • Perfect Size Range: Available in all standard sizes from 6mm to 12mm, ensuring the perfect fit for your rolling style
  • Multiple Styles: Choose from classic round, sophisticated flat, or innovative vortex helix designs
  • Smooth Edges: Every tip is carefully finished with polished edges for maximum comfort and safety
  • Easy Cleaning: Designed with cleaning in mind—wide channels that won't clog and smooth interiors that rinse clean easily
  • Customization Available: Want branded glass tips for your business or event? We offer custom options! 🎨
  • Bulk Discounts: Perfect for shops, brands, or anyone who wants to stock up
  • Fast Shipping: Get your tips quickly with our reliable shipping options

✨ The Perfect Gift for Any Enthusiast

Know someone who's passionate about their rolling experience? Premium custom glass filter tips make an incredibly thoughtful gift. They're practical, long-lasting, and show you understand and respect their hobby. Pair them with quality rolling papers for the ultimate gift set!

🔥 Ready to Roll Like a Pro?

Forget disposable tips that get soggy and fall apart! 🎯 Upgrade to premium glass tips that deliver smooth, clean, flavorful sessions every single time. Your rolls deserve the best!

  • ✔️ Infinitely reusable & eco-friendly ♻️
  • ✔️ Premium borosilicate glass construction
  • ✔️ Smooth edges for ultimate comfort 😊
  • ✔️ Available in multiple sizes & styles 🌈
  • ✔️ Easy to clean & maintain ✨
  • ✔️ Customize with your brand or design 🎨
🛒 Shop Premium Glass Tips Now

📦 Bulk orders available | 🚚 Fast shipping | 🌟 Premium quality guaranteed

❓ Frequently Asked Questions

Q: How do you roll glass tips for the first time?
Start by selecting the right diameter glass tip for your paper size (8-9mm works for most standard papers). Place the glass tip at the mouth-end of your paper and align it perfectly straight. Add your ground material, leaving a small gap next to the tip. Tuck the paper edge over the tip, maintaining steady tension as you roll. Keep the glass centered and the paper smooth—no bunching! Once rolled, seal with the gum strip and finish with a gentle pinch-and-twist at the junction to lock everything in place. Test the airflow before your final seal and adjust if needed. Don't worry if your first few attempts aren't perfect—this skill develops quickly with practice! 💪
Q: What's the best size glass tip for rolling?
For standard 1¼ papers (the most common size), an 8-9mm diameter glass tip is your best bet. If you're using slim or single-wide papers, go for 6-7.5mm tips. King-size papers and larger rolls work best with 10mm or bigger. The perfect size depends on your rolling style too—if you roll tighter, you might need a slightly smaller diameter; if you roll looser, size up a bit. When in doubt, 8mm is the universal "safe choice" that works for most people and paper types. As you gain experience, you'll develop a feel for exactly what diameter suits your technique! 🎯
Q: Can you reuse glass filter tips?
Absolutely—that's literally their biggest advantage! Quality glass tips made from borosilicate can be reused hundreds or even thousands of times with proper care. After each use, do a quick rinse with warm water. Every few uses (or weekly for regular users), do a deep clean with isopropyl alcohol—soak for 10-15 minutes, shake vigorously, rinse thoroughly, and dry completely. This keeps them clean, clear, and performing like new. One glass tip can easily replace a year's worth of disposable alternatives, making them incredibly cost-effective and eco-friendly. Many users report having the same glass tips for years! ♻️
Q: Why does my roll keep coming loose with glass tips?
Loose rolls usually come down to one of three issues: insufficient rolling tension, size mismatch, or inadequate sealing. Make sure you're maintaining firm, consistent pressure throughout the rolling process, especially during that critical initial tuck around the glass tip. The pinch-and-twist technique at the junction is crucial—don't skip it! Also verify your tip isn't too small for your paper width; if there's too much excess paper, it won't grip properly. Finally, ensure you're thoroughly moistening the gum strip for a strong seal. If problems persist, try sizing up your glass tip by 0.5-1mm or practice applying more tension during rolling. It's a skill that improves rapidly with practice! 🔧
Q: Do glass tips affect the flavor or experience?
Yes—in a very positive way! Glass is completely neutral and non-porous, which means it won't absorb or alter the flavors like some materials can. You get pure, unaltered taste that lets you fully appreciate the complex flavor profiles of your herbs. Glass also stays cool to the touch, blocks unwanted particles more effectively, and provides consistent airflow from start to finish. Many users report that switching to glass tips was a game-changer for flavor clarity—especially if you're coming from cardboard or paper crutches that can sometimes add subtle papery notes or absorb desirable flavors. Once you experience the clean taste of glass, it's hard to go back! 🌿
Q: How often should you clean glass filter tips?
This depends on your usage frequency, but here's a good rule of thumb: Do a quick warm water rinse after every single session (takes 30 seconds and prevents most issues). For deep cleaning with isopropyl alcohol, daily users should clean every 2-3 days, moderate users (3-5 times weekly) should deep clean weekly, and light users (1-2 times weekly) can get away with deep cleaning every 2-3 weeks. You'll know it's time for a deep clean when you notice restricted airflow, visible residue buildup, or any flavor changes. Regular cleaning isn't just about hygiene—it maintains optimal performance, flavor purity, and extends the life of your tips indefinitely. Trust me, clean tips = better experience every time! ✨
Q: What's the difference between roll-in and slip-on glass tips?
Roll-in tips are integrated directly into your paper during the rolling process—you place the glass at the mouth-end and roll the paper around it, creating a seamless, built-in connection. This method offers superior structural integrity and a more professional finish, but requires more rolling skill. Slip-on holders are added after rolling is complete—you simply insert your finished roll into the hollow glass holder. Slip-ons are incredibly convenient, perfect for pre-rolls, and ideal for beginners who find rolling intimidating. Neither is objectively "better"—they serve different needs. Many experienced users keep both types on hand: roll-ins for traditional rolling sessions and slip-ons for quick convenience or pre-rolls. Try both and see which fits your style! 🎯

🎓 Final Thoughts: Your Journey to Rolling Mastery

Congratulations—you've just completed the most comprehensive guide on how to roll glass tips available anywhere! 🎉 Whether you're a complete beginner or an experienced roller looking to refine your technique, you now have all the knowledge you need to roll like an absolute pro.

Remember, mastering glass tip rolling is a journey, not a destination. Your first few rolls might not be perfect, and that's totally normal! Every expert roller started exactly where you are now. The key is to practice regularly, pay attention to the details we've covered, and don't get discouraged by early mistakes. Each roll teaches you something new about tension, alignment, and technique.

🎯 Key Takeaways to Remember:

  • Size matters: Match your glass tip diameter to your paper size (8-9mm for most standard papers)
  • Tension is everything: Firm but not excessive—finding that sweet spot is the secret to perfect rolls
  • The pinch-and-twist is your friend: This simple technique locks everything in place and prevents slippage
  • Clean tips = better experience: Quick rinse after each use, deep clean regularly
  • Practice builds muscle memory: Your technique will improve dramatically after just 10-15 rolls
  • Invest in quality: Premium borosilicate glass tips last forever and perform better

The benefits of rolling with glass tips are clear: cleaner experience, better flavor, eco-friendly sustainability, and that satisfying cool-glass feel that never gets soggy or falls apart. Once you've experienced the difference, there's really no going back to disposable alternatives.

💪 Your Next Steps:

  1. Grab a quality glass tip in the right size for your papers (8-9mm if unsure)
  2. Set aside 30 minutes for focused practice without pressure
  3. Roll 5-10 practice pieces, focusing on one aspect at a time (first tension, then alignment, then sealing)
  4. Test different techniques from this guide to find what works for your style
  5. Establish a cleaning routine from day one—future you will thank present you!
  6. Join the community of glass tip enthusiasts and share your experience

Most importantly, enjoy the process! Rolling with glass tips isn't just about the end result—it's about taking pride in your craft, perfecting a skill, and elevating every aspect of your experience. The ritual of rolling becomes more satisfying, the results more consistent, and the overall experience significantly enhanced.

Have questions we didn't cover? Discover a technique that works great for you? We'd love to hear about your glass tip rolling journey! Share your experiences, tips, and creative innovations with the community. After all, the best learning happens when we share knowledge with each other. 🤝

Now get out there and roll some perfect glass tip pieces! You've got this! 🌟

Happy rolling, and may all your sessions be smooth, flavorful, and perfectly rolled! ✨


Leave a comment

Please note, comments must be approved before they are published

This site is protected by hCaptcha and the hCaptcha Privacy Policy and Terms of Service apply.